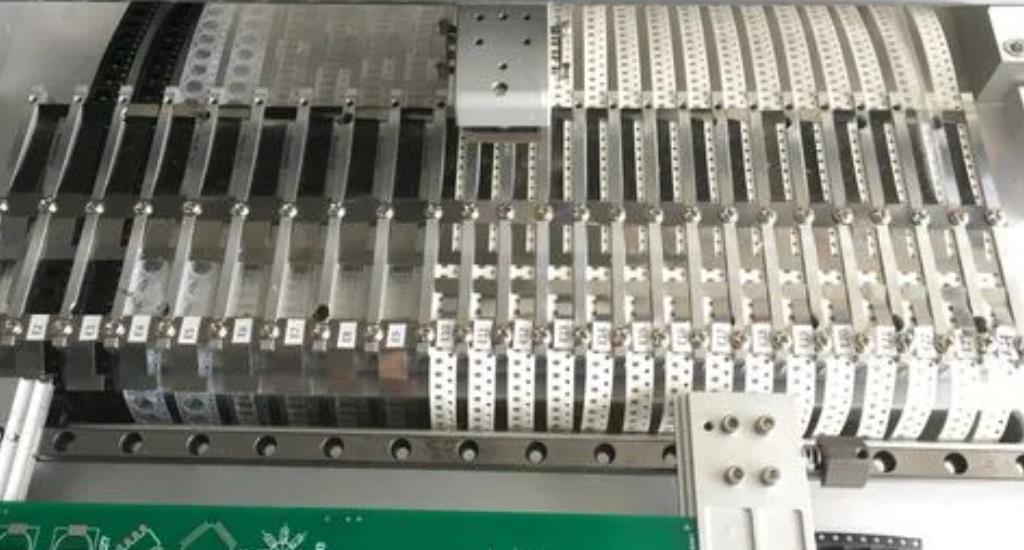
SMT punch machine is an important equipment for PCBA processing and production, mainly used in electronic product processing of electronic components installed in a device,the industry is now mainly used in the SMT punch machine is fully automated,and punch processing of the device are increasingly refined,fast,integrated.Punching machine not only improves the industry's entire output value,but also for the development of electronic intelligence manufacturing industry to provide a stable and reliable quality assurance. Punching machine work process,to be refined components installed on the PCB circuit board,it is necessary to use a very precise and source of electronic components to provide a continuous supply of auxiliary tools,that is,Fidelity (feeder), the industry is also known as the feeder,which is the components to a fixed position,and then through the punch machine suction nozzle movement will be components paste suction mounted on the PCB circuit board to the designated location,thus the shows the importance of the feeder in the work of the SMD machine,so how should we operate and use it correctly in order to effectively ensure the long-term stability and reliability of the feeder?Now we introduce in detail the flyer (feeder) the correct use of Samsung brand as an example.

Selection of Belt Feeder
1.Belt feeder is generally divided into 8mm2P, 8mm4P, 8mm4E,12mm,16mm,24mm,32mm, etc.,where (P) stands for paper tape and (E) stands for adhesive tape.
2.The feeder should be selected according to the actual width and pitch of the belt,generally 8mm2P can replace 8mm4P, 8mm4P can replace 8mm4E,but it should be noted that 8mm2P cannot replace 8mm4E.
Installation of Belt Feeder
1.Open the presser cover and the belt guide on the Flyer Belt.
2. Place the material reels on the Flyer reel frame.
3.Pass the upper belt and conveyor belt through the belt guide slots and the main frame,then remove the cover from the head end of the belt and roll the belt to the point where the material is suctioned,and then place the conveyor belt into the slots of the guide rails.
4.When the sprocket clamps the moving slot of the conveyor belt,pull down the belt guide.With the belt guide flat against the conveyor belt,finally adjust and confirm whether the conveyor belt is properly clamped in the sprocket.
5.Flatten the fixed separated top cover tape between the gears and the moulding gears to exclude it.
6.Push the tape to the pick-up point using the rotating arm.

Modification of Flyer Transmission Pitch
1.8MM belt feeder has 2P and 4P spacing,each should use its own feeder.
2.12MM belt feeder can be adjusted to 4MM, 8MM, 12MM according to the type of parts.
3.16MM belt feeder can be changed to use 4MM, 8MM, 12MM, 16MM transmission interval.
4.24MM belt feeder can be set to 4MM, 8MM, 12MM, 16MM, 20MM.
5.Use a screwdriver to unlock the original fixed position, hold the handle to move to the required pitch of the material, to be consistent with (4, 8, 12, 16, 20). Connect the fixing screws.
Mounting and dismounting the feeder base.
1.Before installing the feeder and base,use a brush to clean the base of any remaining loose material and other foreign objects.
2.Each feeder base slot has its own slot number.Insert the feeder into the slot with that number according to the table provided by the technician.
3.Push the feeder in with appropriate force until the locating pin located at the lower front of the feeder meets the vertical plate.
4.Push the handle forward to secure the feeder to the feeder base and check that the feeder is securely fastened to the feeder base.
5.In order to detach the feeder from the feeder base,first make sure that the equipment is in a stopped state.After checking,pull back the handle to unfasten the feeder,hold the handle with your hand and move the feeder backward until it is detached.
Maintenance and Inspection
1.Check whether all screws on the feeder are loose or not (monthly).
2.Add appropriate lubricant to the parts that are frequently transmitted (monthly).
3.Clean the sprocket parts of impurities (daily).
4.Demagnetise the Shuttle (monthly).
5.Check the LED light status (every day).
Notes on the Flyer
1.It is prohibited to store the feeder in the place where the magnetism occurs.
2.There should be no collision between the feeder and other objects.
3.When disassembling the feeder, it should not be disassembled and stacked.
4.Make sure to maintain the cleanliness of the feeder to prevent malfunctions and to reduce the delay of production due to the malfunction of the feeder.
5.When disassembling the feeder, it should be gently carried and put down to reduce the damage of the pcb components.

Description of the components of the flyer
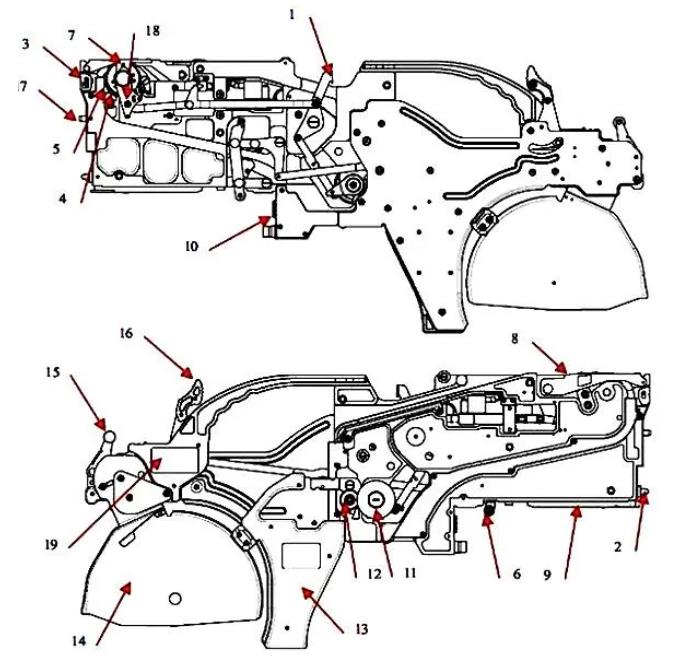
1.Swing Lever;2.Location Flange;3.Omitted;4.Ratchet;5.Sprocket;6.Clamping Roller;7.Shutter;8.Omitted;9.Install Guide;10.Probe Pin;11.Suction Gear;12.Externally Mesh Gear;13.PCB Control Panel;13.External Mesh Gear;14. Installation Guide;10.Probe pin (Probe Pin);11.sucking gear;12.externally mesh non-circular gear;13.PCB control board cover;14. Roll wheel frame (Roll wheel frame);16.Slightly 17.Slightly 18. Pusher Lever (Pusher Lever); 19. barcode.
The above is the PCBA processing in the use of Fidelity, Fidelity (feeder) in the SMT playing pieces is very important, we should need to correctly operate the use of Fidelity in order to effectively ensure the long-term stability and reliability of the Fidelity.